Time keeps rollin' and dust keeps flying in the shop as we work through the rainy Minnesota fall
days. As always a lot has happened this week. Some good and some bad! It was a rough week as we were tested on our knowledge of Rhino, and tested our skills at hand bending the rib structures for out arch top and mandolin builds. However things were also new and exiting in CAD class where we began drawing actual guitar blue prints, and seeing our arch top builds coming along is getting to be a real treat.
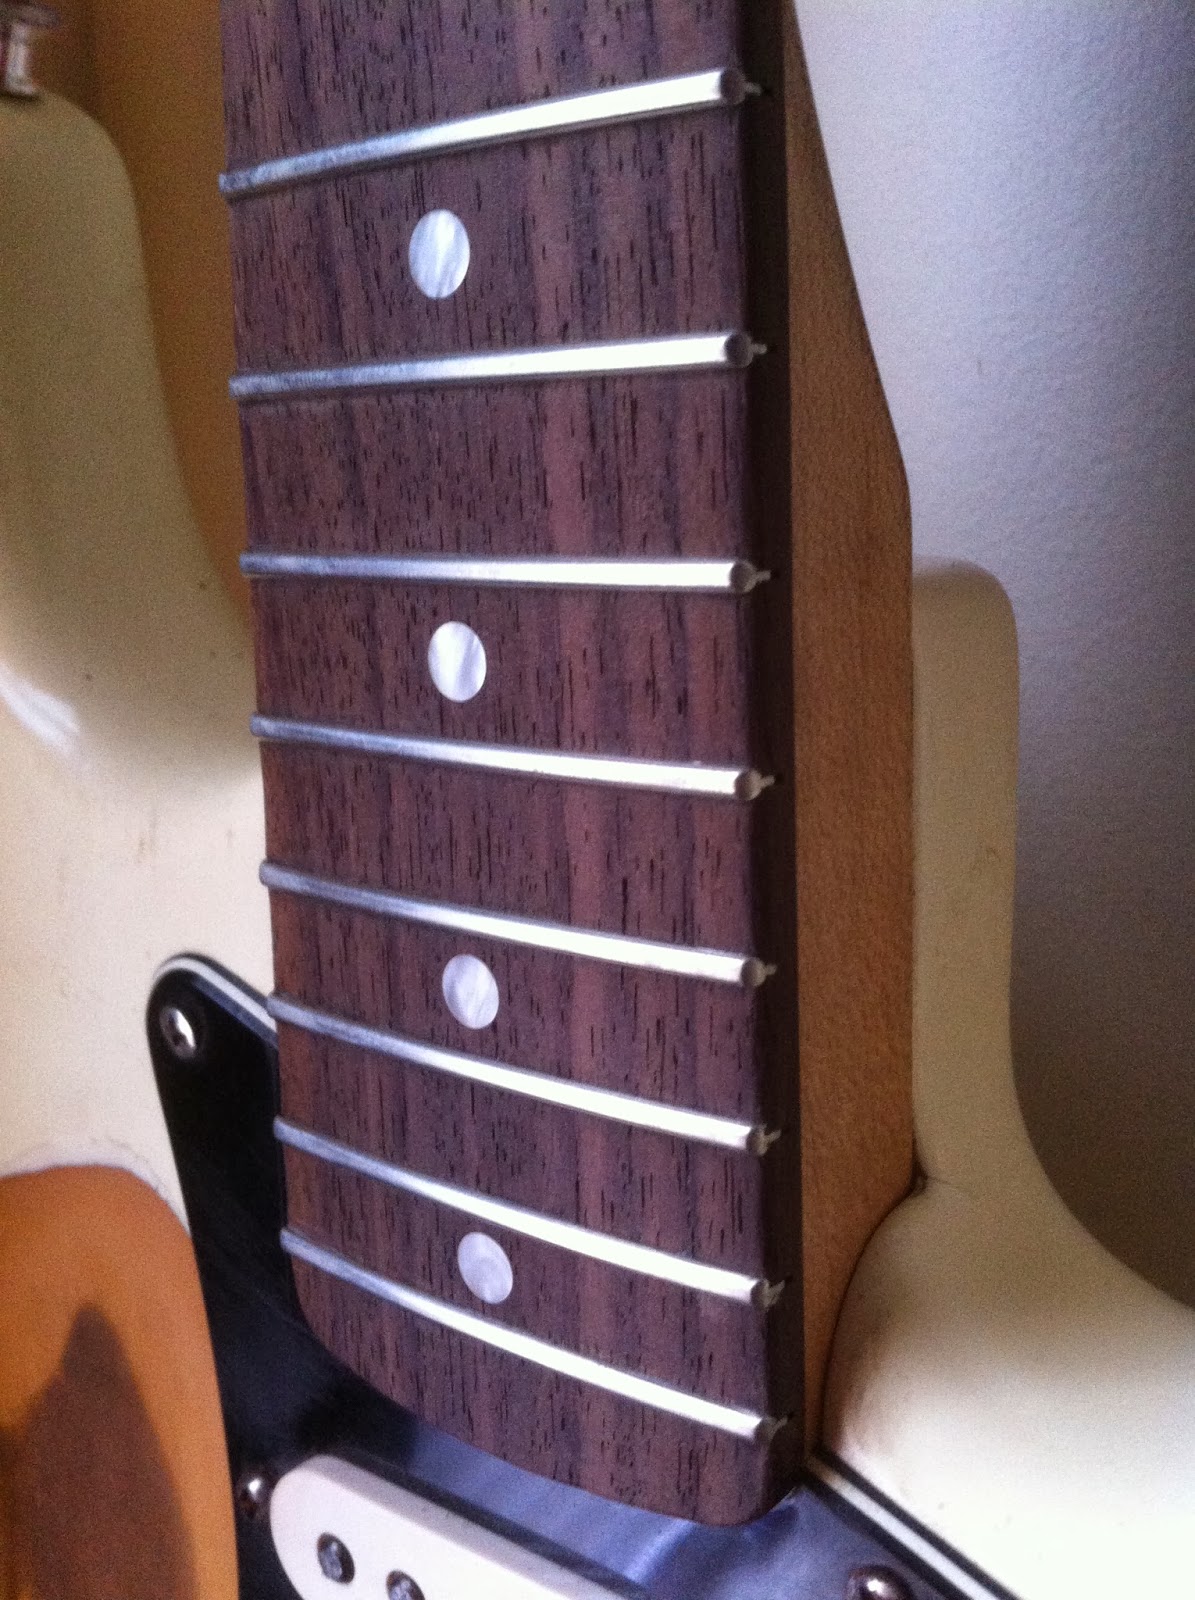
Monday In repairs class I finished and received a 199 out of 200 point score on the Complete re-fret on my Stratocaster. The work included removing the old frets, worn from 13 years of hard play, re- dressing the radius on the rosewood fingerboard, installing new frets, leveling, crowning, filing and shaping each end individually over the extreme round over of the board edges, and polishing them to a mirror shine. The job was a bit more work than the average fret job because when I was 18 and untrained in the art of luthiery i had done some "relic" work to my favorite guitar. Including destroying the finish on the body, and hand rolling the edges of the fingerboard for that "vintage" feel. Needless to say i took it a bit far! Although the guitar feels and plays like a dream now I have found that some repair work will be slightly complicated by my untrained efforts to re create that worn in look! Regardless, now that i have the proper training the re-fret came out perfect and she's ready for another 15 years!
The last thing she needs is a new bone nut, and a set of new locking tuners. I discovered that 2 of the tuning machines had corroded and cracked their housings when i went to re install them. ( Probably a result of a hard life of gigging and general rough use as I continued to naturally age it through years of club gigs practices, and even a few dips into swimming pools!)
CAD class was tense on Tuesday morning as we were tasked to draw certain items from the Rhino manual with tight time restrictions Our instructor Steve Rossow, who is a CAD wizard ( and has recently done notable things with recreating the great Stradivarius violins using Rhino design programs ) Wanted to quiz us and see how well we were picking up the program and its tools and uses. I am not the most computer savvy cat in the class but I feel that I preformed on par with most of the class. After the grueling test however, we moved on to something much more interesting, and useful to our field. We began drawing from plans a full scale blueprint of a Martin style dreadnought guitar. The finished drawing will include the top, back, bracing, rib, neck profiles, fingerboard with scale, and head stock. I may end up using this print next semester to build a guitar for a friend.

Thursday and Friday were all about bending the ribs for our arch top and mandolins. During our acoustic guitar builds last year we used a modern method for bending sides in which the side is moistened with water, sandwiched between a sheet of spring steel, and heated with an electric heat blanket as it is gently pressed and clamped over a mold to give it its shape. Then the bent rib is clamped into an outside mold and glued to the end blocks.This year David wanted to teach us the more traditional method of hand bending ribs using a bending iron. This method has been used for many years by stringed instrument makers all over the world and takes a bit of skill and finesse. The bends of the F-style mandolin are especially tough to make for a first timer being that the rib around the scroll area has to be bent to about a 3 inch diameter half circle. Take into account that the rib is only 1.5mm thick and has deep flame figure all through it making it very brittle and this is definitely not a task to be taken lightly. The rib is sprayed with water to soften it and create steam when applied to the hot iron to help the wood conform to its curves. Then slowly and using just the right amount of pressure the rib is pressed and worked around the iron until it matches the shape of the inside mold for the instrument.


After each section is bent to shape it is clamped onto the inside mold to dry in place. Once dry the rib is glued to the corner, neck and tail blocks where necessary and clamped to cure.


As the rib is bent you must also make sure to keep the piece parallel to the table and perpendicular to the iron surface to prevent twisting it as you move along. Even with the wood softened and the gentlest of pressure even pros sometimes crack or snap ribs. A crack on an outside curve means you must start over with a fresh piece. I was about finished bending this the largest section of rib when i heard and felt that horrible sound. Crack!

And so after about 40 minutes of bending and working it was time to star all over! I decided to take a break and finish up another important piece of the build process. I made a template for the neck of the mandolin out of plexi glass that will be used to trace the shape of the neck onto the maple neck stock. I first traced the neck shape onto the plexi glass. Then rough cut it on the band saw. I then trued it up to its final shape using files and scrapers.


Once the tension from the first rib crack wore off I was able to bend a new section in only a few minutes ( go figure ). This section will be the long piece that wraps from the scroll area all the way around the bass side of the mandolin. It is cut to length and fit into a small notch in the back of the tail corner block to ho;d it in place.


All that left is one last small section to cover the rear of the corner block and lock the long rib in place
and the rib structure will be complete! Then is on to linings and carving out the inside of the top!
Check in next week to see where we go from here!
No comments:
Post a Comment