Sunday, March 31, 2013

Week 3.. Templates, Body Parts, Spray gun, and Finger paints!!


     Another week packed with new info! And A lot of work! The electric build is coming along slowly but surely, and I am learning more about finishing wood than I ever thought there was to know.

     Monday and Tuesday were spent finishing our plywood body, routing, and head stock templates. These templates will serve as tracing and routing guides when cutting shaping and routing our electric guitar bodies and head stocks.

      I have here a body outline template which will give me a guide to trace out the shape of the body onto the body wood and flush trimming the shape with a router. I created another template with the shape of the body and the pick up and control wiring cavities to use as a guide to rout those cavities into the body . I then made a template for the head stock shape.

     The body will be made of Alder. I purchased a large Alder body blank that came with some imperfections and rough edges. I had to cut the chunk in half and join and plane the edges and faces to perfectly square to be re joined and glued together with no gaps. The 2 pieces are planed down to 1/16 inch over final thickness to leave room for final thickness and sanding. Then they are glued together and clamped for a few hours bringing the 2 back into 1. The cutting and re gluing is not necessary when using a 1 piece body blank if you have a joiner and planer wide enough to handle the entire body for squaring.


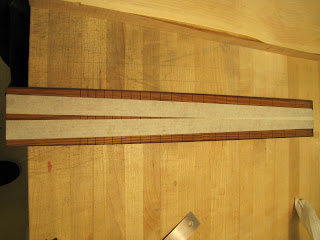
While this was drying I took the time to lay out the fingerboard taper and fret slots onto the gorgeous Cocobolo fingerboard blank that i have chosen for this project. I put 22 standard slots onto the board in a 24 inch short scale length. Next week I'll ad vintage style clay dot inlays on its face and bass edge before sanding in a 12 inch radius. 


      Shes a real beauty! Cant wait to see it up against a tortoise pick guard and sea foam green paint!

      After the body joint was dry and strong i used my template to draw out the body shape onto the wood. Then i cut out the shape on a band saw and taped the template to the rough shape and flush trimmed it out to perfect on the router table. These two steps were a bit stress full The slightest miss step here could have been disastrous for the build. I took my time and worked carefully to ensure a problem free cut. 


            I also spent some time squaring up my flamed maple neck wood. The hard flamed maple will make a nice looking and very sturdy neck. This leaves me with all my body parts ready for next weeks work which includes cutting out the neck and head stock, installing the truss rod, fretting the fingerboard, laying out and routing the neck pocket, installing the bridge, and routing the control cavities.


       Finishing class on Wednesday and Thursday was fun this week as we continued using the spray guns to apply coats of lacquer to our project practice boards, and began the color mixing practice. Our instructor Brian joked about how if any one came through the classroom they would think we were back in kindergarten finger painting!  We reviewed primary secondary and intermediary colors and started making a color wheel. This  took me back to elementary art classes. We also played with tinting and shading colors with white and black to make lighter and darker colors. i chose to use green for this because I'm looking for the perfect shade of sea foam/ mint green for my finished guitar. i like the light green block in the middle of the light shades.... what do you think?


         And these are my mahogany project boards in Gibson Red and Medium Mahogany Sprayed with 8 coats of clear lacquer. The next step for these is level sanding smooth and polishing to a shine again.


        I also Did some toning to my scarf joint mock up from last semester. it is a light beach wood aerosol toner. Tough to apply in an even coat to get even color. 


       Fridays repair class was spent learning how to make replacement Fender Style nuts. This process is similar to making acoustic style nuts with a few variations in the process. The micarta blanks are sanded down to the proper shape, the bottom is sanded into a radius to match the curved slot and the top is sanded to the same curve.  The nut is then slotted for strings and the corners are rounded off for comfort and good looks. This skill will be valuable for repair work later.


        Stay tune for next week when the electric build starts heating up and i start doing real repairs on my own old guitars....

Sunday, March 24, 2013

Electric Week 2, Blueprints, Dyes and Spraying


             This week has been full of progress both on our electric builds and our finishing techniques.
Monday and Tuesday were spent wrapping up the details on our blueprints and beginning work on our templates for construction.
         
              I was glad to finish my blueprint. Although it was very time consuming and tedious, it is very nice to have a full scale plan for the build and have all the details ironed out before starting the actual build. This should help eliminate any problems along the way.


                Wednesday we dove back into finishing techniques, which I am enjoying quite a lot. I have always been interested in how the gorgeous, perfect finishes were achieved on furniture and instruments. It is another part of this whole process that separates the true craftsmen.

                This week we learned the process of brushing on Shellac, and French Padding finishes. We also learned how to apply colored pore fillers, and use turbine spray units to apply seal coats and clear lacquer.
I enjoyed the French Padding, a hand applied finish technique in which you apply a very thin finish in thin layers using a light polishing motion and a cotton, and cheese cloth pad. It takes some patience and skill to apply just the right amount in each coat and polish just enough so as not to rub through the work you have done. I applied 4 coats on Tuesday, and 4 coats on Wednesday using the brushing and padding methods.


8 coats of Brushed on Shellac


8 coats of French Padding

             In between coats of shellac there is a 1 hour dry time. This time was used to apply colored pore fillers to a few more Mahogany boards. The pore fillers are also interesting to me. They are used to fill the open pres and grains of the wood to provide a smooth surface for clear coats later. They are colored with dyes to color the grains and the surrounding wood providing rich looking shades in the finished projects.
The pore filer is brushed on, allowed to sit a few minutes, then squeegeed off pressing it deep into pores and removing the excess from the wood surface. Its messy but fun work!


Med. Brown Mahogany pore filled on Mahogany Veneer


Gibson Red as seen on SG and 335's pore filled on Mahogany Veneer

                We also laid out a dye color chart onto a piece of Maple veneer using all the common dyes in the guitar industry. This will help later when trying to color match a finish for repairs on finished instruments.


             There will be many projects going on at once in our two day finishing class, and all of them have dry times between coats which we use to practice spraying finish with the turbine spray guns in our downdraft spray booth. The booth used fans and filtration systems to keep a steady stream of clean air running in from the ceiling and out around the floor of the room. this helps remove dust and contaminants from the room as well as over spray from the air.  


Down Draft Spray Booth

            We also got to try our hand at spraying an aerosol toner onto a Spruce board we had prepped last week. The toner is a colored lacquer that is used to color the wood before clear coats are applied. 


Medium coating of Cherry Wood toner on Spruce Board

              Friday was spent installing the neck, bridge and stop bar, and routing a pick up cavity on my mock up electric body blank. This mock up has proven to be an essential learning tool as it allows us to encounter and solve problems that may arise with these tricky tasks before attempting them on our actual electric builds. I have taken a rectangle Poplar block and routed a neck pocket for a bolt on neck. Bolted on the neck. Laid out and installed a Tune-o-matic Bridge and Stop-bar tail piece. Then laid out and routed a cavity for what would be a humbucker in the neck position. 


Toss in a pick up, a volume knob and string it up and you've got yourself an electric guitar Bo Diddly style!

That wrapped up my busy week in the shop. Next week its more finishing work and starting the body construction for the electric build! Thanks for looking and stay tuned!

Sunday, March 10, 2013

A Change of Pace, Week 1 Electric Build, Finishing, Repairs


   Well, things have slowed down a bit this week but the new information is still coming in over-sized helpings. My group has switched back to electric guitar mode under the expert direction of Mr. Brian Boedigheimer. Brian Will be teaching us the process of planning and constructing solid body electric guitars, as well as finishing techniques, and more basic guitar repairs.

   Our Mondays and Tuesdays are focused on our electric builds and we are starting from the beginning with planning and blue printing our designs. Students have the option to copy existing guitars, use elements of their favorites, or completely design a fresh new look for their builds. I have chosen to Use all my favorite design elements from the Fender Company and mix and match them to create my own design. You may recognize parts of the popular Fender models in my build.
   The first step of this process for me was to come up with the body shape using many pictures of my favorite existing guitars and many hours at the drawing board. I have actually been planning this guitar for almost a year. Once the shape looked pleasing to me, i took the small drawing to an overhead projector and blew it up to full size onto a piece of thin poster board. The shape is then cut out and used as a tracing template for drawing the blue print, and later for making a plywood template for the body. I also had a paper template of the pick guard I intended on using taped to this body template to help ensure proper placement.


The blue print is started by laying out the neck proportions; length, width, and taper. This will provide the scale for the drawing since everything is based off of the scale length. Scale length is another option that must be carefully considered to give the desired feel for playing the finished guitar. There are about 4-5 standard scale lengths used for electric guitars; 25.5 is standard for most Fender, 24.625 for Gibson etc. I chose to use the comfortable very short 24.0 scale length used on the Fender Jaguar.
   Once those decisions are made the face view drawing of the guitar can begin The finished blueprint will include a face view, and side view including all pertinent measures and placements of  hardware, controls, cavities etc.


   Its hard to see in the florescent lighting but the drawing is coming along nicely. A drafting kit is used to facilitate smooth clean lines.

   Our Wednesdays and Thursdays are spent learning wood finishing techniques. Our instructor is a master finisher, and  he will be introducing us to each step of the process, and checking our work along the way.
The most important part of the finishing process is also the least fun. SANDING..... And sanding and sanding.... The wood must be prepped properly to accept the finish. This means that all machine marks, deep scratches and imperfections must be removed. Many wood workers either rush or skip through theses steps, and some spend far too long sanding. Either way the evidence shows in the finished product. Our first bit of practice was on some mahogany veneer pieces that had already been sealed, stained, and clear coated. It was our job to apply a hand rubbed satin finish to one and a hand rubbed high gloss to the other.
The satin look is achieved with sandpaper and very fine steel wool. The sand paper smooths the clear coat but leaves small scratches which then must be removed with the steel wool leaving a soft smooth  "satin" look and feel. This look and feel ca also be achieved using satin sprays which are common in mass produced wood work and guitars for their cost effectiveness.


   The high gloss finish is a bit harder to get by hand, and requires more steps, and quite a bit of elbow grease. The finished board is wet sanded with 2 stages of fine grit sand paper and then hand buffed with 2 stages of buffing compound on soft cloth. Each stage of rubbing must eliminate any scratches left from the previous step. The 6x12 inch board took a few hours to polish to a mirror shine.


   Hopefully my guitars will shine like that!!!

   Friday is repairs class, which is set up to teach us more valuable shop repair methods. Our time must be accounted for and tracked on a time sheet just like in most real work settings.  This week in repairs we learned the process of determining neck angles and routing neck pockets for bolt on guitar necks. A process that will be essential in building our electric guitars and helpful in the shop should we ever have to replace a neck or repair a neck and body joint.
   A drawing was made taking into account all the important measurements for neck angle; neck height, bridge height, pocket depth, and neck length. Using these measurement I calculated the neck angle and used that number to create a shim and a template for the neck pocket. The template and shim are attached to the  
"body" (in this case a poplar block I had prepared in the first semester power tools class) and the neck pocket is routed using a plunge router and a flush trim bit.


The finished product is a nice clean pocket that fits the neck tightly and provides the correct neck angle for the guitar.

Next week is a much needed Spring Break, interestingly enough i have never wanted a Spring Break less!!! I just want to keep working on guitar stuff!!! I will use the break to finish my blue print and be ahead of the game when we get back to class. Until then thanks for reading and be sure to check back in a few weeks!