Sunday, December 15, 2013

Halfway Home.....


          Well Its almost halfway over! This year of learning and doing has been flying by so fast its almost hard to believe that each day is a day closer to a dream come true! The clock is ticking down to holiday break and with that the countdown begins to finishing all the projects that are on the bench.

The old Five Star guitar that my mother bought in the 60's learned to play and passe to me to play is officially a guitar again! It has gone through quite the transformation. It has almost been rebuilt! The process was long but very educational and rewarding. I had to re-glue the top and back, repair and brace a cracked rib, re-glue some internal braces, re-set the angles of the neck, re-fret the entire fingerboard on the non adjustable neck, and make a new bridge for the guitar. Each step was dependent on the others and had one not gone well all of the others would have suffered. With patience, skill, and hard work, the guitar plays and feels better than ever and still retains that first guitar charm.
All strung up, set up, and ready to play the blues 
 Nice low action with no buzz
 New solid Rosewood bridge and Silk and Steel Folk strings
 New nut to top off all the work 

          The CAD and CNC class is finally paying off with the finish of all of the drafting leading to the production of molds and templates for the upcoming builds. For me this includes Inside Bending, and Outside Clamping molds for the acoustic build. Along with neck and head stock shape templates for the acoustic, and head stock shape template for the electric build. These were all taken from our Rhino CAD drawings and loaded into the MasterCAM program where we created the tool paths that tell the CNC machine where and how to cut the parts out. This process is relatively the same as most of the large manufacturing operations like Fender, Gibson, PRS, etc, and will be the same process used for making most of the parts of my spring acoustic and electric builds.
The CNC machine cutting the plywood inside and outside mold patterns
 Each inside and outside panel is an exact copy of the others. They are layered and attached together.  
 The outside edges are cleaned up of any glue and splinters. The inside Bending Mold is made of 7-8 layers
wide enough to bend the sides of the guitar around.
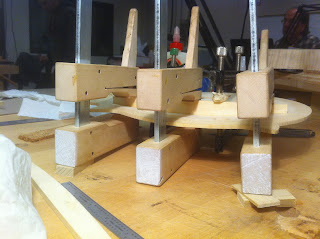
 The outside mold is made of 4 layers and will give the final shape of the guitar. After the sides are bent they are clamped into the outside mold to help them retain their shape until the top and back are glued on.
 The machine cutting out 1/4 inch thick templates of the acoustic head stock, neck, and electric head stock.
 These templates will make the construction much simpler, and provide permanent reference for future builds. 

           The mandolin build is almost halfway finished as well with the final touches being done to the top and the ribs. The scroll has been finely hand carved and smoothed to perfection ( or as close as I can get! ) and the entire top has been hand flushed to the ribs. The ribs have been smoothed and flattened to give the router a firm base for routing the binding channel around the edge. This leaves the mandolin ready for routing, which will be done first thing next semester when i have the bindings ready to install. 
The scroll In all its hand carved glory.
 The smooth top arching


 The elegant blended points.
 All trimmed and ready to move on to back and neck construction!

           Thanks for all of the support and following along with me in this journey. Now its time to kick back and enjoy some much needed time off, and holiday cheer! Happy Holidays to all!

Sunday, December 1, 2013

Wood Chips and Turkey


          Happy Thanksgiving all! Its been a busy few weeks here in Red Wing. Lots happening to all the projects. And Getting sooo close to finishing some of them! Sometimes I wish I could just work on one thing till its done, but our class schedule does not work that way.

          Repairs class has shifted focus to mainly working on the the restoration/rebuild of the old Five Star guitar. Still gluing more cracks and getting the body structurally sound. I've made a new bridge for it, out of Indian Rosewood, to replace the old worn down maple one. I done a complete re fret on the neck and begun the task of re setting the dovetail neck joint to the proper angles for good string action and intonation
.
 Shiny New Frets! Went with modern nickle fret wire to replace the tiny old brass frets. different look but better play-ability.
 The old "ebonized" maple bridge. and tail piece. The tail piece will be re used with a new bridge.
 The old bridge is falling apart.
 The bridge was glued in place however i will leave the new one floating to be adjustable for intonation.

 The new Rosewood replacement bridge. 
The dovetail heel must be carved away a bit to adjust the necks angle. A few more chisel strokes and sandpaper swipes and she'll be fit and ready to re unite with the body. 

          The CAD classes are getting more complex as I draft the 3D versions of my spring semester builds. The acoustic build has been blue printed in 2 and 3 dimensions as well as the Telecaster neck through build. The drawings are almost complete and only lacking fingerboards and dimension notations.

 View of the 3D acoustic 
 Inside the box look at the back bracing
 Inside the box look at the top bracing
 Perspective views of the neck through Tele 

Back view of the Tele

          The mandolin build is moving forward. The tone bars have been fit shaped and glued in. The top has been glued onto the rib structure. The scroll area of the top has been flushed up to the scroll block of the ribs and the final carving of the scroll has begun. Once the scroll has its final shape all that's left is making the neck. carving the back ( this will be done on the CNC machine to save time ) and the huge task of the binding of the body. 
 The tone bar braces are fit to the inside arch of the top, and glued in place.

 The bars fit the arch of the top with less than a .002 inch tolerance along their length.
 The bars are then shaped by hand with planes and scrapers to lighten them and allow them to move better with the top.


 The scroll is still a bit rough and will be flushed and smoothed by hand using various sanding sticks, scrapers, files, and other tools.
 The lines of the scroll are laid out to give a guide for the carving tools.

 The scroll is carved to higher detail using the pencil lines as a guide. 
The shape is roughed in and just needs to be scraped and sanded smooth. 

          That's all for now. Only a few more weeks to finish up these projects for grades at the end of the semester! I can't wait to get the Five Star strung up and playing again! Hopefully she'll be up and running this week! Stay tuned and Happy holidays! 

Monday, November 11, 2013

The Work We Do


          Busy week and busy weekend! Lots happening in the shop and at home. This week will be a captioned pictorial post. Just cant find the time to put the thoughts together.

Repairs class was full of clamping and gluing with a bit of measuring and drilling on the side!
 The Five Star needs a lot of crack and separation repair. we begin with the worst of the rib cracks clamping and pressing and gluing a section at a time. This crack begins with the top loose of the rib at the lower bout and continues all the way around the upper bout.
                   The crack closes up nicely but will still need a bit of finish work to hide it completely.
 On the other side the rib has split down the center. The crack will be glued and clamped together, then braced with a few small patches on the inside. 
 This crack closes up nicely and is almost invisible. 
 What crack?
 The back has separated from the ribs at the upper bout and glued up nicely.
 CLAMPS!!!!
These will be left on over night.  Then we'll see what we have.

The 60's Hollow Body Electric bridge update came along a few more steps as well.
 The correct scale length was measure out and laid out on masking tape on the top. Then the new holes were drilled for the new bridge posts. Notice how far off the original was! 
 The plugs and screw holes will be filled and finish matched to hide them. 
 The original bushing (bottom) was raised off of the top and held in place by two screws. The new bushing (top) is recessed into the top and held in place with 3 screws. The new bridge posts will thread into the new bushings for a much more stable bridge. 
 Test fitting the new tune o matic bridge. Fits perfectly and should put the guitar in fairly precise tuning. 
Looking good. All that's left is to hide all the old holes. 

CAD class is switching modes from 3D acoustic drawings to starting our CNC project guitar drawings. 
I will be building a custom offset waist, neck through guitar for this project with elements borrowed from some of my favorite electric guitars, 
Here's a few shots of  the 3D rendering of the top braces for my acoustic build.


In Arch top Construction class I spent the last day and a half of the week fitting and carving the two tone bars that run along the inside of the top of my mandolin build. The bars provide strength and support to the top to help it withstand the pressure of the string tension . 
 A pencil and a steel washer help to trace the inside arch of the top to the brace.
 The brace with the arch of the top traced on and ready for carving.
The locations for the braces are taken from plans and laid out inside the top.
 Small blocks are tacked in place to ensure the brace is placed in the same place each time as it is fit.
 Chalk is applied to the top and the brace is set in place and rubbed very slightly to pick up the chalk.
 The brace is then shaved down only where the chalk has transferred. This brings the high spots down until the whole surface is touching.
 One down One to go! 
Second brace fit nicely to the top in the last few minutes of class. Ill have to glue them in next week!